
☰
Walking and distance guides
How to Measure Your Own Step Length
Measure step length from a known distance and counted footfalls. Learn two repeatable methods and how to match the landing marks to the intervals.
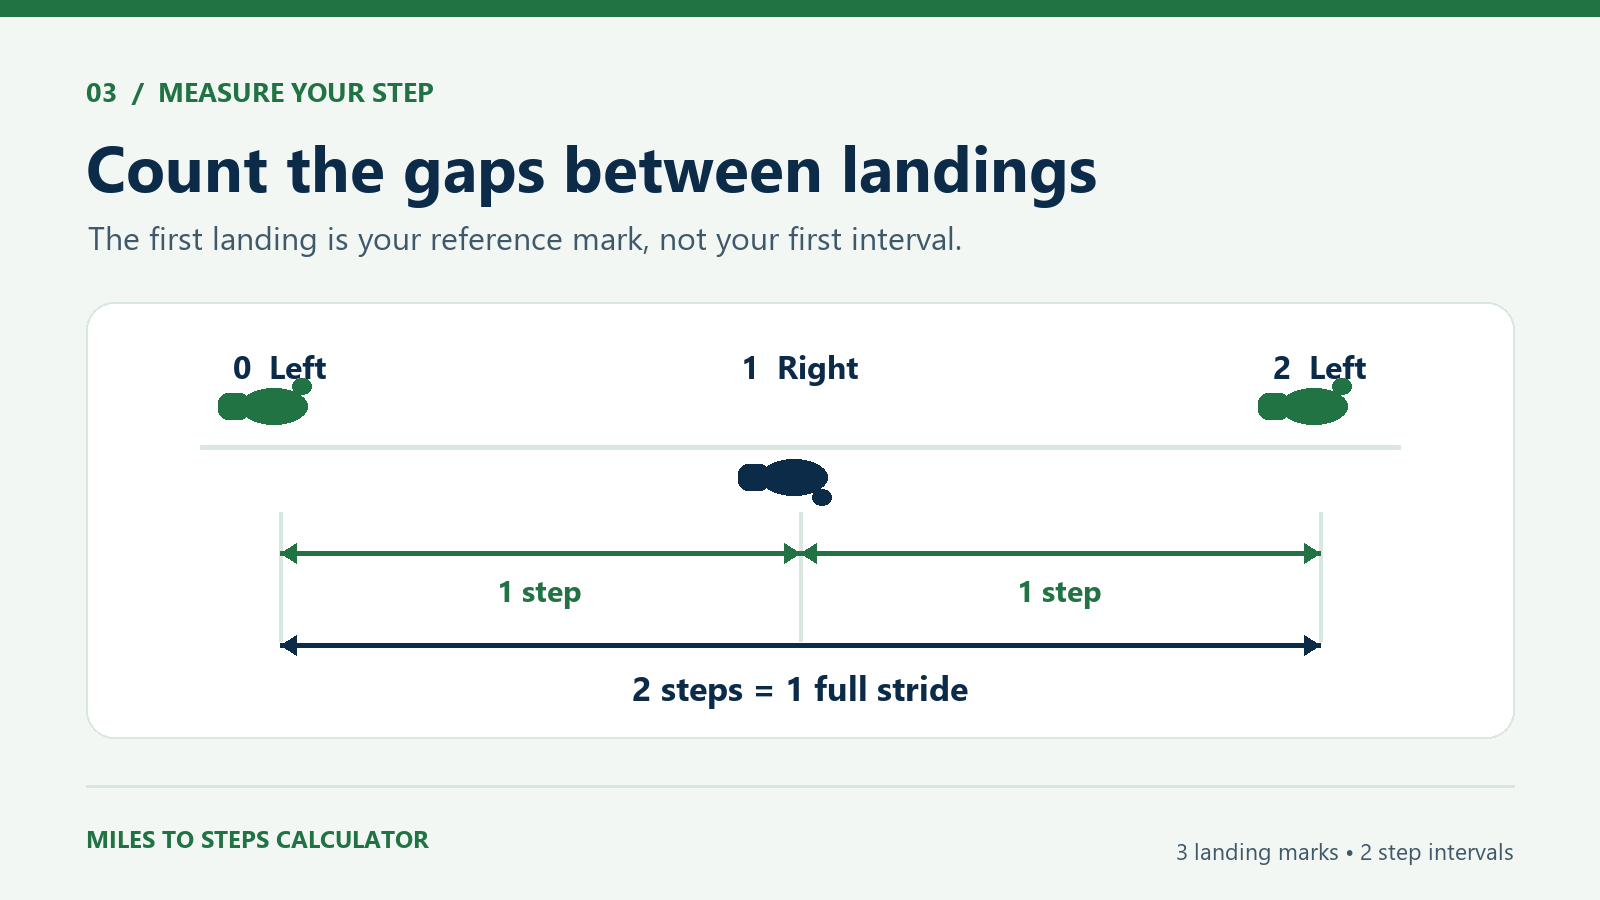
The quickest way to measure your step length
Divide a measured distance by the number of steps that actually cover it. If ten step intervals span 7.6 metres, your average step length is 0.76 m, or 76 cm. A measured route with a larger step count works too: 100 metres divided by 132 steps gives approximately 75.8 cm per step.
Use the length of one footfall interval in a miles-to-steps calculation. You can measure it with a tape and footprint marks, or estimate it by counting steps over a known course. The second method is convenient when you do not want to stop and mark each print. The first makes it easier to see exactly where the measurement starts and ends.
Once you have a distance and count, enter them in the Step Length Calculator. Use a pace and surface that resemble the activity you plan to estimate.
Step length, full stride and step width
Step length is the distance advanced from one landing to the next along your direction of travel. A left-heel mark to the next right-heel mark is one step. A left-heel mark to the next left-heel mark spans a full stride, which contains two steps. Step width is the side-to-side separation and does not belong in this distance conversion.
Measure along the line of travel rather than diagonally between the left and right footprints. Use the same reference point on each footprint, typically the back of the heel when you can identify it. If your two step lengths differ slightly, a multi-step average still works for an overall distance estimate.
Wearable apps sometimes call a one-step setting “stride length.” Check the manual or use a simple sanity check: if the app multiplies its total footfalls by that setting, it expects distance per footfall. Giving it the length of a full left-to-left cycle would double the distance estimate.
Method 1: measure a series of marked footprints
- Choose a straight, level stretch with room to approach and continue beyond the measured area.
- Walk at your normal pace. Mark or record a reference heel landing once you are moving steadily.
- Use that first reference landing as zero. Count the next ten landings as 1 through 10, counting both feet.
- Measure the forward distance from mark 0 to mark 10. Use a helper or recorded marks if stopping to mark each landing would change how you walk.
- Divide that distance by ten, then repeat to see how stable the result is.
There are eleven landing marks for ten intervals in that example. If you have only ten marks including the first, the distance from the first to the last spans nine intervals. This off-by-one difference matters: a distance of 7.6 metres divided by nine is about 84.4 cm, compared with 76 cm when it actually spans ten intervals.
OMRON’s pedometer guidance gives the same practical distance-divided-by-steps approach. The numbered-mark example here makes the interval convention explicit so the numerator and denominator describe the same movement.
Method 2: count steps over a known course
Use a measured straight path or a marked track section. Confirm the length of the section before starting. A known route is preferable to a distance calculated by the same watch or app whose step-length setting you are trying to check.
Approach the start at your usual pace, count each footfall during the section and continue past the finish. Use a consistent rule for landings at the boundaries, such as including a landing at the start and excluding one at the finish. In a fixed-course test, the first and last landings may not line up exactly with the markers, so the result is an average estimate rather than a precise measurement of every interval.
For example, 400 m ÷ 526 steps ≈ 0.7605 m per step. The same count over 100 m would imply a very different length, so verify the measured distance as well as the count. If you use a track, confirm which lane and markings correspond to the measured length; a full outer-lane lap need not equal the standard inside measured lap.
A longer course can reduce the relative effect of one uncertain boundary step, as long as you maintain the activity you intend to measure. Use multiple shorter trials if a longer course would cause you to change pace or interrupt the count.
Worked step-length examples
| Measured distance | Counted steps or intervals | Length per step |
|---|---|---|
| 7.6 m | 10 | 0.76 m (76 cm) |
| 25 ft | 10 | 2.5 ft (76.2 cm) |
| 100 m | 132 | ≈ 0.758 m (75.8 cm) |
| 400 m | 526 | ≈ 0.7605 m (76.05 cm) |
| 200 m across two trials | 266 | ≈ 0.7519 m (75.2 cm) |
Match the numerator and denominator. For 25 feet and ten intervals, 25 ÷ 10 = 2.5 feet per step. That is 30 inches or 76.2 cm. For 100 metres and 132 steps, the calculator output is about 0.758 metres, which is 75.8 cm, not 0.758 cm.
Use NIST’s exact foot conversion when switching units: one foot is 0.3048 m. Preserve precision during the calculation and round only the displayed measurement. A convenient rounded value is often more honest than reporting more decimal places than your course and count can support.
Repeat the test and combine trials correctly
Do two or three trials at comparable pace and on the same surface. For equal-distance trials, add the distances and the step counts, then divide the totals. If two 100 m tests take 132 and 134 steps, the combined estimate is 200 ÷ 266 ≈ 0.7519 m, or 75.2 cm per step.
That combined method also works if your trials have unequal lengths. It weights each trial by the number of steps contributing to the estimate. A plain average of a five-step trial and a 500-step trial would give the short trial more influence than its count warrants.
If one trial is very different, investigate rather than silently discarding it. Check for a count error, a different route line, a pause or an unintended pace change. A genuinely different activity may deserve its own measurement instead of being averaged into your usual walking result.
Measure walking and running separately
Record what the measurement represents: easy walk, brisk walk, steady run, treadmill session or another condition. A different speed, surface or movement pattern can change the distance covered with each step. Measure an easy run at an easy running pace rather than using a brisk walk as a substitute.
For an interval session, use separate length measurements for the walking and running parts. For example, 1 km at 0.75 m per step is about 1,333 walking steps, and 1 km at 1.00 m per step is about 1,000 running steps. The two-kilometre session would be about 2,333 steps under those assumptions. See What Changes Your Step Length? for when it makes sense to measure again.
What if you cannot measure right now?
Height can provide a rough estimate for walking. This site uses 42% of height as an optional starting point, so 170 cm gives 71.4 cm per step. That is a shortcut with a disclosed assumption, not a personal measurement. Barreira, Rowe and Kang found a difference between height-based estimates and observed lengths in their young-adult sample.
Use a height estimate for casual planning when it is all you have, then replace it with a measurement when comparing routes or calibrating a device. The homepage’s height mode is for walking; it is not used as a running formula.
Apply and check your measured length
Enter the value and matching unit in the Miles to Steps Calculator. The result displays the step length used and estimated steps per mile. At 76.2 cm per step, one mile gives 2,112 steps. Compare the result with another measured outing under similar conditions before assuming it works for all of your movement.
You can also reverse the process: 10,000 steps × 76.2 cm per step = 7.62 km, about 4.73 miles. The 10,000-step distance guide explains what happens when you combine several kinds of movement in one daily count.
Step-length measurement questions
How many steps should I measure?
Ten matched intervals are a practical short example. A longer measured course or repeated trials can reduce the effect of a single uncertain landing if you keep a representative pace.
Can I measure from toe to toe?
Use a consistent reference point and measure forward along the path. Heel marks are often easier to compare; switching between toe and heel changes the measured distance.
Can I use my treadmill’s displayed distance?
Yes for an estimate of that treadmill session if you trust its calibration. A separate overground test is more appropriate when you want a length for outdoor walking.
Sources and method notes
Manufacturer guidance, exact unit factors and the height-estimation study are linked above. The worked measurements are examples, not observations of a particular person or medical gait assessments. Site methodology · Report a correction.